Saturday, 10 May 2014
Tuesday, 11 March 2014
1st year pinch pot creatures.
Learning Outcomes.
To design and create a clay coiled pot creature, while also exploring
· form,· tactile texture,· pattern,· colour· Clay techniques and skills· Research skills· Design skills
- Painting techniques and skills.


http://floraceramics.com/PinchPotExamples.html

http://www.pinterest.com/pin/321866704590343706/
Step 1
Mark making in clay. Creating tactile patterns.
What is pattern? All elements are used in pattern, can you spot them in the examples below?

http://simswiki.info/images/thumb/a/a2/Arches.jpg/287px-Arches.jpg

http://thumbs.dreamstime.com/z/diamond-pattern-shape-background-12253426.jpg

http://www.colourbox.com/preview/5011074-436268-seamless-metal-grill-with-diamond-shape-pattern-vector-illustration.jpg

http://www.pollyannapickeringstudio.co.uk/products_pictures/14192-7.jpg

http://demilked.uuuploads.com/nature-pattern-photography/nature-pattern-photography-18.jpg
https://encrypted-tbn2.gstatic.com/images?q=tbn:ANd9GcSl3JoG_TJAtFO7nNiNOiXrEVl_dQ14YEYs7q2l27ZyGJPlcK3l

http://farm3.static.flickr.com/2522/3790881052_5975ddac48.jpg

http://static.squarespace.com/static/5117a7cde4b04c436edbf7d5/51d853ebe4b0e11051514e23/51d853f9e4b0e110515153a1/1277674256000/D304076-Edit.jpg?format=original
Homework.
- Describe in your own words the meaning of pattern and write this description into your sketchbook. Collect images of 5 patterns and stick them below your description.
- Collect images of the creature you would like to create.
Step 2
Using your collected images of the creature you would like to create, design on paper how you will evolve your creatures from your research. Use the images above to be inspired not to copy.Homework
Finish the design process with colour and pattern included
Step 3
Learn how to create a coiled pot. Using your mark making techniques, turn the coiled pot into a creature.http://www.lakesidepottery.com/Pages/Pottery-tips/Making-a-clay-coiled-pot-Lakeside-Pottery-Tutorial.htm
Step 4
From your previous painting project, mix colours and paint your creature.
Sunday, 16 February 2014
Altered Art
Project outline.
Create a tonal drawing to the best of your ability and then alter it.
Why bother? Because you are moving on with your art. You already have the technical skills now you need to make progress with that and produce art that is experimental, innovative, intriguing, beautiful, different. You are trying to bring your art to the next level.
Here are a few options of how you can alter your drawing to create a whole new piece and bring your art to a new level.
transform your drawing into origami


transfer your drawing onto card, labels etc.

transfer your drawing onto material.
photcopy your drawing onto pre-used paper

transfer your drawing onto material and stuff it.

photocopy your drawing and rework into it.


Make a paper sculpture from your drawing.

transfer your drawing onto glass.

transfer your drawing onto blocks.

Enjoy creating and moving onto the next level with your art.
Thursday, 30 January 2014
Still life; Considering the objects' potential.
Pick an object, now how can you make that object more interesting?
Cut it, break it, peel it, turn it upside down, take it apart and rearrange it, stack it, the list is endless.
peel it http://www.flickr.com/photos/aphexafx/4419579316/
Cut it and rearrange it
http://www.pinterest.com/saskiatrijntje/still-life/
Cut it
http://www.etsy.com/listing/71069814/set-of-2-magnets-avocados-and-tangerines
Break it
http://lyndsayhoffmann.blogspot.com/2010/03/narrative-still-life.html.
Stack it
http://www.masonmurer.com/artists/tharp_sally/10251.htm
Now think of the colour of the objects you are picking.
Would you like harmonious colours, complimentary colours, soft colours, dark colours, contrasting colours..........
contrasting colour bright orange against dark colours.
hot colours
http://www.pinterest.com/saskiatrijntje/still-life/
complimentary colours
http://wasbella102.tumblr.com/post/50186336674
harmonious colours http://www.pinterest.com/saskiatrijntje/still-life/
Now think about what object could add an extra interesting element to a still life, such as reflective surfaces, glass, plastic wrappers, ribbons, scrunched up paper, etc.
reflective metals
http://www.flickr.com/photos/honeyandjam/4316400229/
reflective surfaces
https://blogger.googleusercontent.com/img/b/R29vZ2xl/AVvXsEgnreQRfgQk46mGNjouobPRioglAE2cjQfTQoURe7_5NW6_pCoMJtk4_nEiixr4GvufilOVZYXPONDUGZmilFDuVucm2lw_jfjXx8CZMU9lU3iJAvRNhP-7jGA32S64MJuLHzqocmhNuNvN/s1600-h/Cracked+Shell+HR.jpg
scrunched up paper,http://ffffound.com/image/ac3c10d62a734c859e2b5cd553043bcb1122e8c2
reflective surfaceshttp://stilllifequickheart.tumblr.com/post/2140490554/sarah-sedwick-jewel-tones-2008
glass
http://wasbella102.tumblr.com/post/22266020543/by-israel-hershberg
ribbon
http://www.google.com.au/imgres?q=pictures+in+turquoise&hl=en&sa=X&tbm=isch&prmd=ivns&tbnid=3gVoWBMAIHqEJM:&imgrefurl=http://www.lcneill.com/blog/2009/12/04/turquoise-twister/&docid=ILExVXDuTv4u9M&w=318&h=425&ei=nKdsTuWhDsXomAXMkZgI&zoom=1&iact=hc&vpx=965&vpy=188&dur=1623&hovh=260&hovw=194&tx=161&ty=145&page=7&tbnh=132&tbnw=107&start=147&ndsp=26&ved=1t:429,r:18,s:147&biw=1203&bih=752
Cut it, break it, peel it, turn it upside down, take it apart and rearrange it, stack it, the list is endless.


http://www.pinterest.com/saskiatrijntje/still-life/

http://www.etsy.com/listing/71069814/set-of-2-magnets-avocados-and-tangerines

http://lyndsayhoffmann.blogspot.com/2010/03/narrative-still-life.html.

http://www.masonmurer.com/artists/tharp_sally/10251.htm
Now think of the colour of the objects you are picking.
Would you like harmonious colours, complimentary colours, soft colours, dark colours, contrasting colours..........


http://www.pinterest.com/saskiatrijntje/still-life/

http://wasbella102.tumblr.com/post/50186336674

Now think about what object could add an extra interesting element to a still life, such as reflective surfaces, glass, plastic wrappers, ribbons, scrunched up paper, etc.

http://www.flickr.com/photos/honeyandjam/4316400229/

https://blogger.googleusercontent.com/img/b/R29vZ2xl/AVvXsEgnreQRfgQk46mGNjouobPRioglAE2cjQfTQoURe7_5NW6_pCoMJtk4_nEiixr4GvufilOVZYXPONDUGZmilFDuVucm2lw_jfjXx8CZMU9lU3iJAvRNhP-7jGA32S64MJuLHzqocmhNuNvN/s1600-h/Cracked+Shell+HR.jpg


http://wasbella102.tumblr.com/post/22266020543/by-israel-hershberg

http://www.google.com.au/imgres?q=pictures+in+turquoise&hl=en&sa=X&tbm=isch&prmd=ivns&tbnid=3gVoWBMAIHqEJM:&imgrefurl=http://www.lcneill.com/blog/2009/12/04/turquoise-twister/&docid=ILExVXDuTv4u9M&w=318&h=425&ei=nKdsTuWhDsXomAXMkZgI&zoom=1&iact=hc&vpx=965&vpy=188&dur=1623&hovh=260&hovw=194&tx=161&ty=145&page=7&tbnh=132&tbnw=107&start=147&ndsp=26&ved=1t:429,r:18,s:147&biw=1203&bih=752
Thursday, 16 January 2014
Poster Design
Design is divided up into steps.
Brainstorming for a good concept,
your design should have an interesting idea. Therefore you need to
brainstorm your choice in order to expand your thinking. This way you
should result in an individual different idea, away from the typical
cliches.


http://www.deviantart.com/morelikethis/278712101?view_mode=2

http://conormcinerney.wordpress.com/2012/03/14/ncad-brief-a-bit-late-mindmaps/#jp-carousel-42

http://daintystain.deviantart.com/art/A-Mind-Map-About-Me-301456981

http://www.deviantart.com/art/Organism-Mindmap-NCAD-305755222
For tips on how to brainstorm follow the link below
http://www.wikihow.com/Brainstorm
Yes that means you have to think!!
2.
Research. An idea can always be made better by researching what other
people did with a similar theme. Ideas or part of an idea can be taken from
other people and changed to form your own individual idea. This is called being
inspired. Quite often after research you can go back into step 1 and add more
word/images connected to your theme. Below are some links to help you research, please feel free to email me any other good links. hweir@eurekaschool.ie
www.pinterest.com
www.deviantart.com
www.flickr.com
or just simply googel images and see where that leads you.
3.
Thumbnail
sketch your design. From your research and brainstorming
you chose your concept. Your chosen concept should have an aesthetic appeal.
Therefore you need to thumbnail sketch to see at this basic stage what
composition and elements work best. What yo do on paper now will save you on time later as you can tease out any problems quickly at this stage.
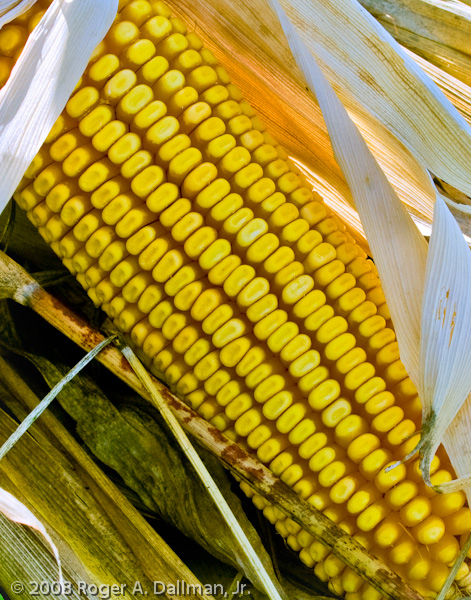
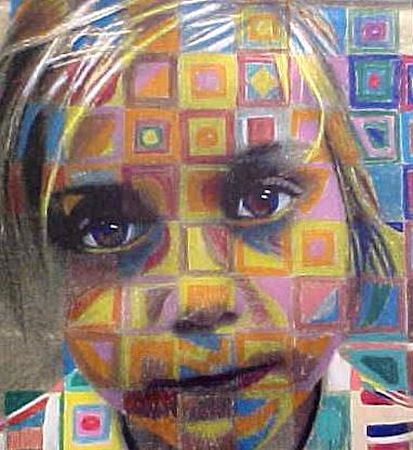
4.
Source material. You now need quality images or actual objects for your final design NO pixelated images like this
So
what needs to be handed up for the exam?
1.
Preparatory sheet; this should include drawings of possible solutions for your
design. (taken from your thumbnails in
step3) Images that you will definitely be using in your design (taken from step 4) and 2 designs from
other artist that inspire you. (step 2)
2. Preliminary
sheet; this is 3 enlarged thumbnail sketches of your final chosen designs. It
should be of good quality but should not take you longer than 40mins. (taken from your thumbnails in step3)
3. Finished
Piece; the actual poster, puppet or
calligraphic piece actualised from one of the final chosen designs in the preliminary sheet
Subscribe to:
Posts (Atom)